Introduction
The Wishflo Dashboard is designed to help you effortlessly organize, manage, and keep track of the pages created by or for you. Alongside your pages, the Dashboard gives you access to My Calendar to manage all your upcoming celebrations in one place.
Accessing Your Dashboard
To get started, simply log in to your account (if you haven't already) and visit your dashboard. You can do this by either clicking the "My Pages" button on the homepage, selecting "My Pages" from the dropdown menu when you click your account icon in the top-right corner, or by navigating directly to wishflo.com/dashboard.
Navigating Your Pages
The Dashboard sidebar has two main sections: Pages and My Calendar.
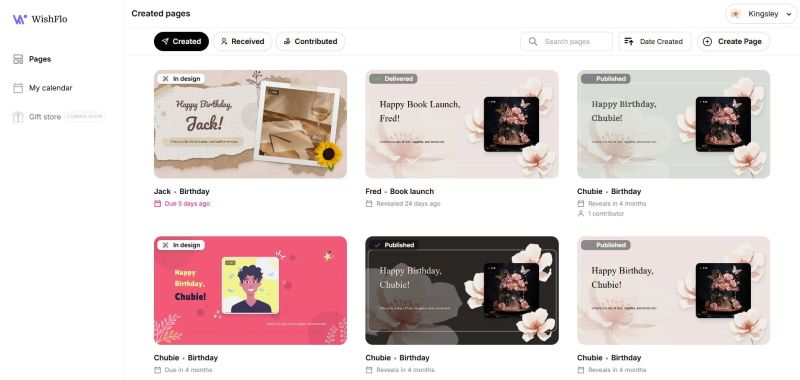
Under Pages, you'll find three tabs for viewing different types of pages associated with your Wishflo account:
- Created: Pages that you've made for others. Clicking a card takes you to the page editor so you can continue managing it.
- Received: Pages that others have created for you as the celebrant.
- Contributed: Pages where you've actively added a wish, video, or gift. Note: Pages you were invited to but haven't contributed to yet will not appear here.
Clicking a card in the Received or Contributed tabs takes you to a read-only view of that page.
Page Cards
Each page card shows:
- Status — the current state of the page: In Design, Published, Delivered, Viewed, or Terminated
- Celebrant name and celebration type
- Reveal date — when the page was or will be revealed to the celebrant
- Contributor count — how many people have contributed (shown if greater than zero)
Terminated pages are grayed out and cannot be opened.
Search and Sort
You can search your pages by name using the search bar, and sort them by date created using the sort toggle. Both controls apply across all three tabs.
Calendar
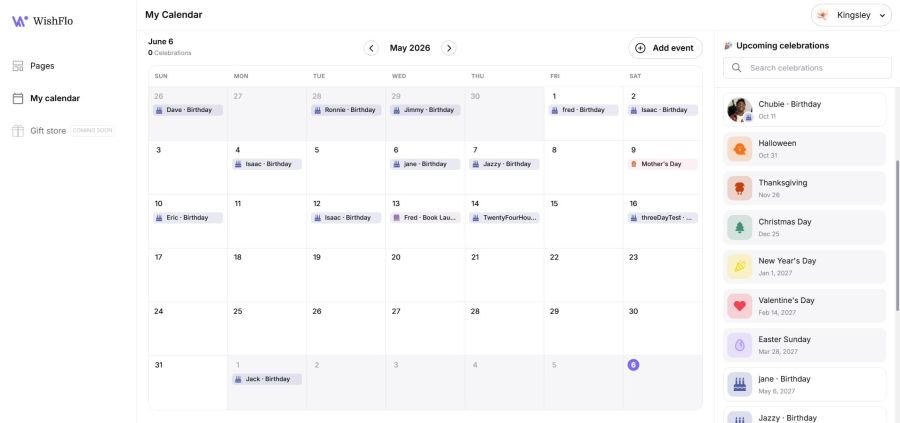
The My Calendar section is built around one simple goal: make sure you never miss an important celebration. Whether it's a birthday, anniversary, graduation, or any other milestone, your calendar keeps everything in one place so you're always prepared and always on time.
How Events Appear on Your Calendar
Your calendar is populated from three sources:
- Saved from page creation: When you create a WishFlo page, checking Save to WishFlo Calendar adds the celebration automatically. Recurring types like birthdays and anniversaries will reappear on your calendar every year, so you'll never have to add them again.
- Added manually: You can add any celebration directly from the calendar without creating a page. This is great for keeping track of events you want to remember but haven't set up a page for yet.
- General holidays: WishFlo automatically adds common public holidays to your calendar as a helpful reference. These appear as read-only events and cannot be edited or deleted.
Views
- Month View: Browse your calendar month by month. Dates with events are marked so you can see what's coming at a glance.
- Upcoming Celebrations Panel: A scrollable list of all your upcoming events sorted by date, with smart labels like Today, Tomorrow, In 3 days, or In 2 months. Events within the next 7 days are highlighted so nothing sneaks up on you. You can also search by name to quickly find a specific person.
Adding an Event
Click the Add Event button, or click directly on any date in the month view, to open the event form. You'll fill in:
- Celebration type: Birthday, Anniversary, Graduation, and more
- Date and time
- Timezone
- Celebrant's first and last name
- Celebrant's email (optional)
- Notes (optional): a handy place to jot down gift ideas, preferences, or anything else you'd like to remember
Viewing Event Details
Click any event in the month view or upcoming panel to open its details. You'll see all the event's information alongside any WishFlo pages previously created for that celebration. From here you can edit the event, delete it, or create a new page for it.
Editing an Event
In the event detail view, click Edit to update any of the event's details. All fields are pre-filled so you only need to change what's necessary. Click Save Changes when done.
Deleting an Event
In the event detail view, click Delete and confirm. This permanently removes the event from your calendar.
Note: Deleting a calendar event does not affect any WishFlo pages that were created from it.
Creating a Page from an Event
Every event has a Create Page button. Clicking it takes you straight into the page creation flow with all the details - name, celebration type, date, time, and timezone: already filled in from the event. The new page is automatically linked back to the calendar event, so your history stays connected.
Email Reminders
WishFlo will send you email reminders ahead of upcoming celebrations so you always have time to set up a page, prepare a gift, or simply reach out. Reminders are sent automatically - no setup required.
Gift Shop
Coming Soon